I love hosting dinner parties! They bring together all of your friends, introduce you to new people and give you an excuse to eat extra delicious food. Added bonus: you get to dress up :) In order to dress up your table, however, you have to know how to properly set it.
Since people don't really study etiquette anymore, full table settings have become reserved for restaurants and weddings, but don't let that stop you from spicing up your table at home. Don't worry, it's not as hard as it looks! I've worked for a catering company for a couple of years now and I'm pretty sure I could do this in my sleep. Practice makes perfect.
1. Dinner Plate
This one is pretty obvious. If you are putting dishes on the table where people can serve themselves, then put the plate in the centre of your setting. The bottom of the plate should be flush with the edge of the table. If you are plating dinner in the kitchen and then carrying the full plates to the table, then leave an empty spot in the setting where you can set it down when the time comes.
2. Soup Bowl
If there's a yummy soup on the menu, plop the bowl in the centre of the dinner plate. Again, if you are serving in the kitchen beforehand then just leave a space.
3. Cutlery
This is where it gets a little finicky. First put down the dinner knife. It goes directly to the right of the dinner plate, facing inwards. Slide it down so that it's flush with the edge of the table. Next, put the soup spoon to the right of the knife. It should also lay flush with the table edge. After that come the forks. Put the dinner fork opposite the dinner knife; directly to the left of the plate and flush with the table. Then lay down your salad fork. The salad fork goes to the left of the dinner fork, but you have to slide it up so that it's about two inches above the table edge. I have no idea why it's done that way, but there you go.
Last but not least, you have the dessert fork and the coffee spoon. These go horizontally above the dinner plate. The spoon goes right underneath the coffee saucer, with the bowl facing towards the left. The dessert fork goes underneath the coffee spoon, but facing the other way. I always remember this by thinking that the forks aren't allowed to look at each other :)
4. B&B Plate
The bread and butter plate is next. Put it down to the left of the salad fork. Easy peasy.
5-6. Glassware
Finding the right spot for the water glass is simple; it goes just above the dinner knife. Then, use the water glass to measure where you put the wine glass. The wine glass should go behind the water glass on a slight angle towards the left. If you have a champagne glass on the table as well (fancy pants!), it also goes behind the water glass but on a rightwards angle instead.
7. Coffee mug and saucer
Last but not least is the coffee cup and saucer. If you are bringing a coffee jug to the table, then it's easiest to put the cups and saucers on the table too. On the other hand, if people are going to the kitchen to get coffee, then just leave them off the table. Slide the coffee saucer down the table so that it sits right above the coffee spoon. The rim of the saucer should cover the spoon just a tad. Next, place the coffee mug onto the saucer, facing up. Some places turn the mug upside down, but etiquette-wise it should be facing up (not that it really matters).
ALL DONE!
If you want to add fancy cloth napkins, here are two ways to fold 'em up.
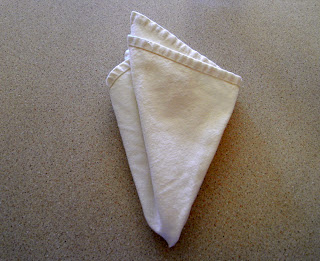
Option One: The Water Glass
Step 1: Lay the napkin flat. Pinch the centre and pull up so that the napkin falls into a triangle shape. It doesn't have to be perfect, they'll look the same at the end.
Step 2: Fold the bottom (pointed) part upwards. Collect the whole napkin in your hand and push it into the glass. The folds will make it stand up straight. All done!
Option Two: The Pocket Fold
Step 1: Lay the napkin flat and then fold the top edge about 1/4 of the way down.
Step 2: Next, fold the bottom edge up to meet the top fold.
Step 3: Fold the left edge over so that it meets the middle of the napkin. Do the same on the other side, but only fold it halfway to the middle.
Step 4: Lastly, flip the shorter folded side over. Leave about a 2'' gap (see below) and then turn it right side up. If you have a printed menu or keepsake, slip it into the pocket (see above).
With a couple of easy steps, you'll have the nicest table in the neighbourhood :)
I'm working on an 'outfit of the day' post as we speak, so it should be up shortly!
I'm working on an 'outfit of the day' post as we speak, so it should be up shortly!
Talk soon,
Vi


No comments:
Post a Comment